> ## Documentation Index
> Fetch the complete documentation index at: https://docs.ando.so/llms.txt
> Use this file to discover all available pages before exploring further.
# Set up Ando on your Mac
> Install Ando, turn on notifications, and get ready for your first Jam.
Let’s get your Mac ready for messages and Jams. A Jam is a voice or video call
with your team.
## Install and open Ando
1. [Download Ando](https://ando.so/download) for your Mac.
2. Open the `.dmg` file in your **Downloads** folder.
3. Drag **Ando** into **Applications**, then open Ando from there.
4. Sign in to your workspace.
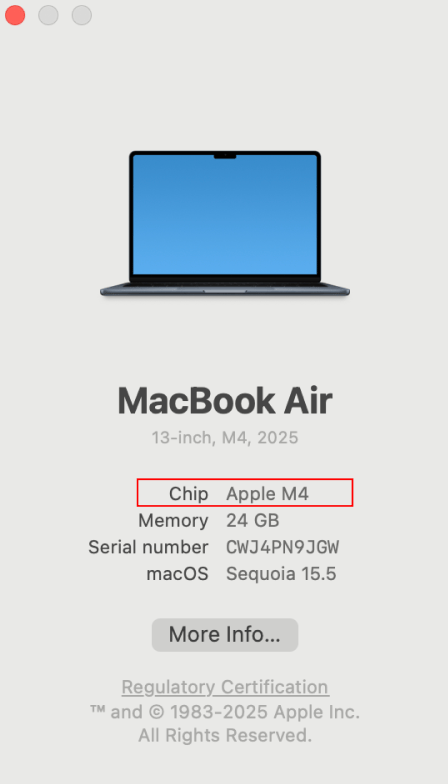
Open the **Apple menu** → **About This Mac**. If **Chip** shows an Apple
M-series chip, choose **Mac – Apple Silicon**. If **Processor** shows Intel,
choose **Mac – Intel**.
 ## Get your Mac ready
Ando walks you through three permissions when you first sign in. Each one
turns green and shows **Enabled** when it’s ready. Permissions you’ve already
allowed are checked for you.
## Get your Mac ready
Ando walks you through three permissions when you first sign in. Each one
turns green and shows **Enabled** when it’s ready. Permissions you’ve already
allowed are checked for you.
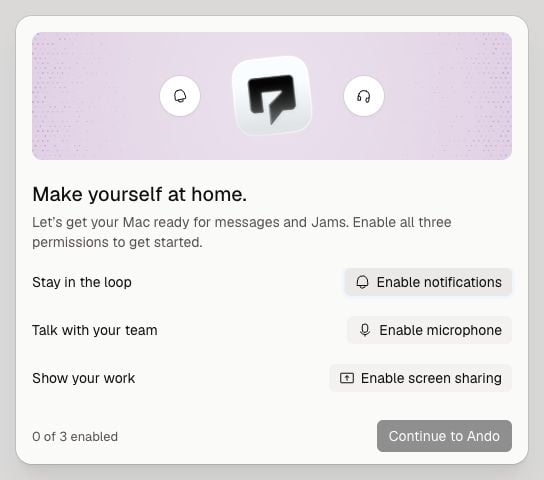 Select **Enable notifications** so you can see messages and Jam invites.
Allow notifications when your Mac asks.
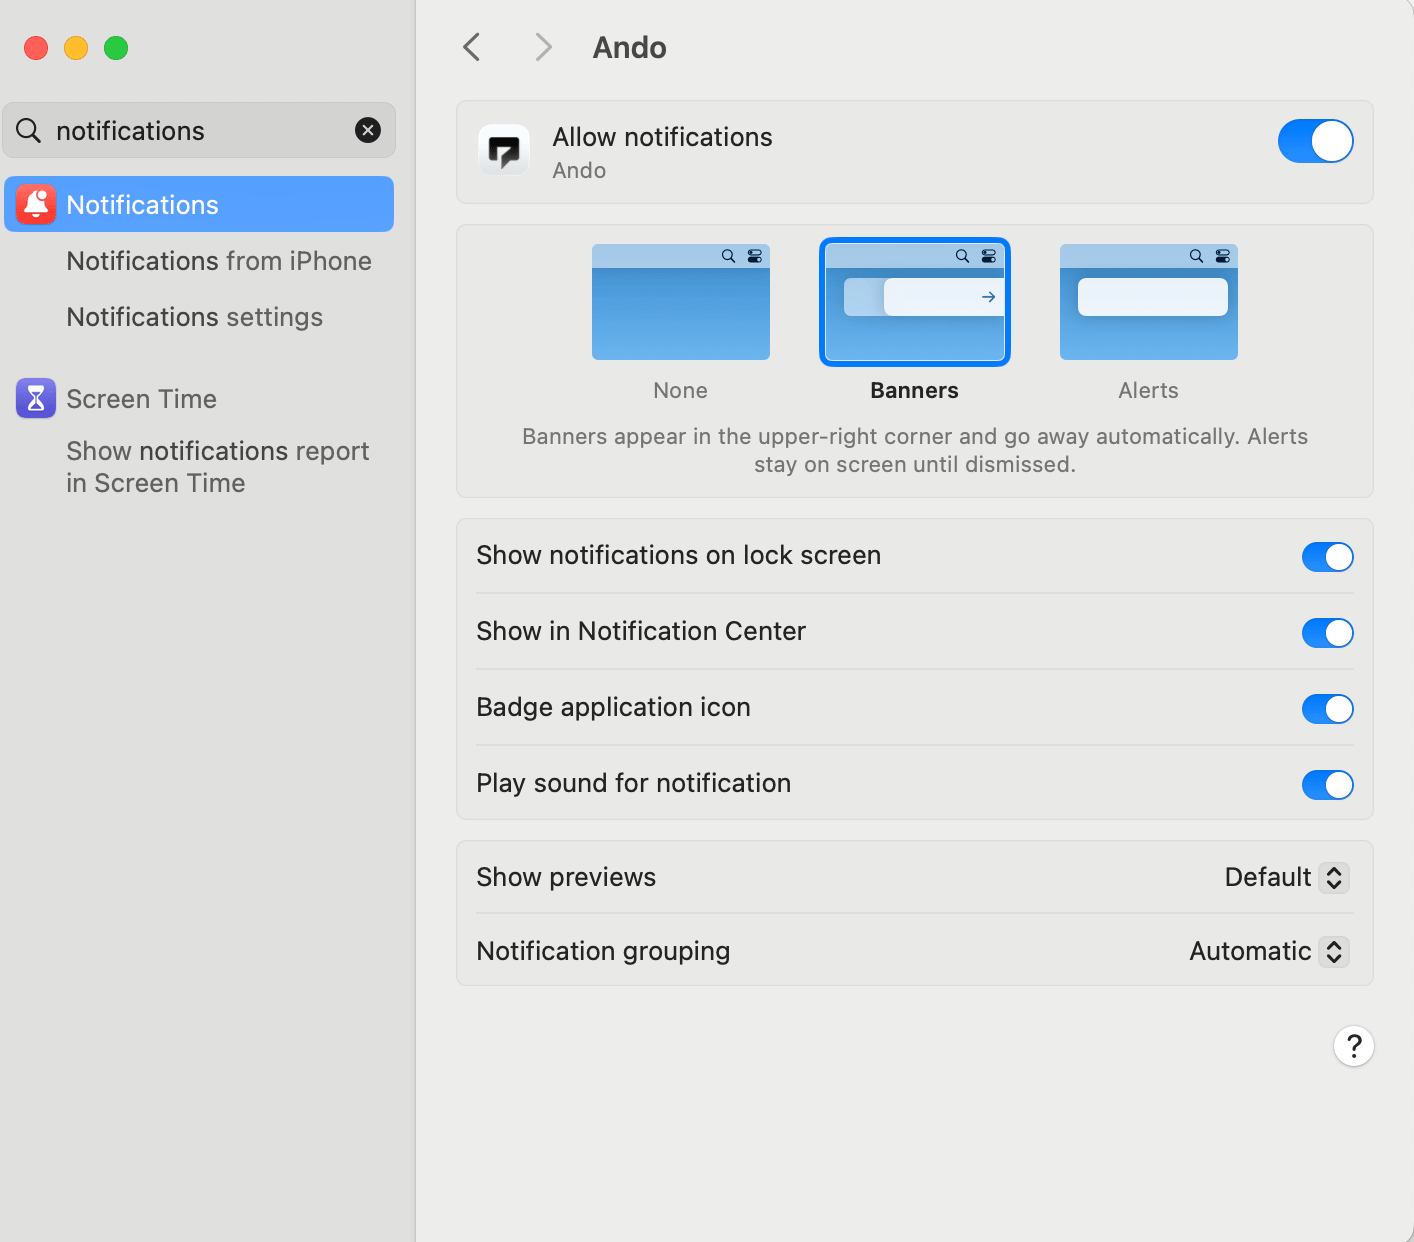
If Ando opens System Settings, turn on **Allow notifications** for Ando
and choose **Banners** or **Alerts**. Then return to Ando.
Select **Enable microphone**, then allow access when your Mac asks.
This lets people hear you in a Jam.
Select **Enable screen sharing**. In System Settings, turn on Ando under
**Privacy & Security** → **Screen & System Audio Recording**.
This lets you share a screen or window in a Jam. You still choose when
to share and what to show.
If you see **Restart and finish setup**, select it. Ando saves your place
and checks your permissions again when it opens. Restarting ends any
active Jam.
Once all three permissions show **Enabled**, select **Continue to Ando**.
All three are required to finish Mac setup.
## If you selected “Don’t allow”
You can change your choice in your Mac’s **System Settings**. Open it from the
**Apple menu** in the top-left corner of your screen.
Go to **Notifications** → **Ando**. Turn on **Allow notifications**, then
choose **Banners** or **Alerts**.
Select **Enable notifications** so you can see messages and Jam invites.
Allow notifications when your Mac asks.
If Ando opens System Settings, turn on **Allow notifications** for Ando
and choose **Banners** or **Alerts**. Then return to Ando.
Select **Enable microphone**, then allow access when your Mac asks.
This lets people hear you in a Jam.
Select **Enable screen sharing**. In System Settings, turn on Ando under
**Privacy & Security** → **Screen & System Audio Recording**.
This lets you share a screen or window in a Jam. You still choose when
to share and what to show.
If you see **Restart and finish setup**, select it. Ando saves your place
and checks your permissions again when it opens. Restarting ends any
active Jam.
Once all three permissions show **Enabled**, select **Continue to Ando**.
All three are required to finish Mac setup.
## If you selected “Don’t allow”
You can change your choice in your Mac’s **System Settings**. Open it from the
**Apple menu** in the top-left corner of your screen.
Go to **Notifications** → **Ando**. Turn on **Allow notifications**, then
choose **Banners** or **Alerts**.
 Return to Ando. If messages still don’t appear, follow the
[notification checklist](/docs/notifications#if-notifications-are-not-arriving).
Go to **Privacy & Security** → **Microphone** and turn on **Ando**.
Then return to Ando.
Go to **Privacy & Security** → **Screen & System Audio Recording** and
turn on **Ando**. On some macOS versions, this is called **Screen Recording**.
If your Mac asks you to quit and reopen Ando, do so. Otherwise, return to
Ando and select **Restart and finish setup** if it appears.
If a setting is locked or managed by your organization, ask your IT team to
allow it for Ando.
## Pick up where you left off
If Ando closes during setup, open it again. Your setup will resume.
To check permissions after you finish, open **Settings** → **Download apps** in
Ando and select **Open desktop setup**. If you don’t see this option, you can
still check each permission in your Mac’s System Settings using the steps above.
## Make notifications work for you
In Ando, open **Settings** → **Notifications**. Choose which messages and Jam
calls should reach your desktop. [See notification options](/docs/notifications).
Still stuck? Email [hello@ando.so](mailto:hello@ando.so) and tell us which step
you’re on.
This documentation is built and hosted on [Mintlify](https://mintlify.com), a developer documentation platform.
Return to Ando. If messages still don’t appear, follow the
[notification checklist](/docs/notifications#if-notifications-are-not-arriving).
Go to **Privacy & Security** → **Microphone** and turn on **Ando**.
Then return to Ando.
Go to **Privacy & Security** → **Screen & System Audio Recording** and
turn on **Ando**. On some macOS versions, this is called **Screen Recording**.
If your Mac asks you to quit and reopen Ando, do so. Otherwise, return to
Ando and select **Restart and finish setup** if it appears.
If a setting is locked or managed by your organization, ask your IT team to
allow it for Ando.
## Pick up where you left off
If Ando closes during setup, open it again. Your setup will resume.
To check permissions after you finish, open **Settings** → **Download apps** in
Ando and select **Open desktop setup**. If you don’t see this option, you can
still check each permission in your Mac’s System Settings using the steps above.
## Make notifications work for you
In Ando, open **Settings** → **Notifications**. Choose which messages and Jam
calls should reach your desktop. [See notification options](/docs/notifications).
Still stuck? Email [hello@ando.so](mailto:hello@ando.so) and tell us which step
you’re on.
This documentation is built and hosted on [Mintlify](https://mintlify.com), a developer documentation platform.